Did you know that ear stretching has some ties to royalty? The famous pharaoh you may know as King Tut is reported to have had enlarged piercings in his ears up until age 19. Many other cultures have used stretched earlobes to signify wealth or wisdom, and some cultures continue these traditional practices.
However, today, most westerners simply like the look.
So, if you’re interested in ear stretching but need some information before getting started, this guide is for you. Keep reading for a comprehensive look at ear gauging and how to stretch your ears.
What Is Ear Stretching?
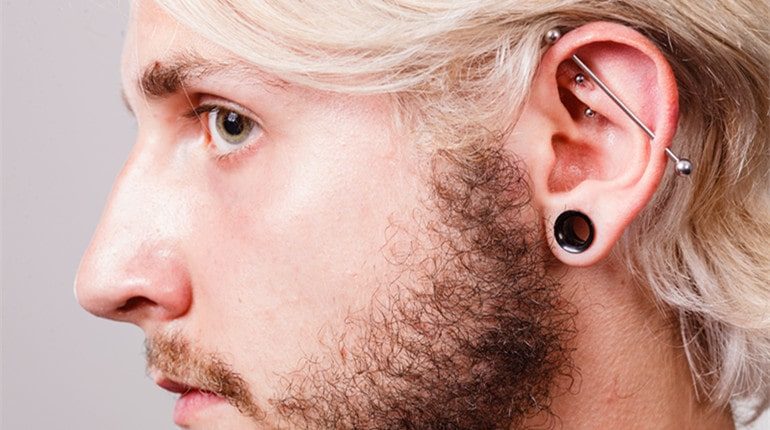
Ear stretching, also known as ear gauging, is a type of body modification that involves stretching your ear piercing over a period of time until you reach your desired size. To do so, you usually use tools called tapers. However, at larger sizes, many use a combination of tapers and special body-safe tape.
After being sufficiently enlarged by the taper at each stage, you adorn your newly stretched piercing with jewelry like tunnels or plugs.
Determine Your Ear Stretching Goals
The first step on this journey is deciding how far you want to go. Ear gauge sizes range from the standard piercing size at 1mm (AKA 18 gauge or g,) eventually reaching size 2g, which is 6mm or a 1/4 inch. Then, at the bottom is 0g at 8mm, followed by the largest sized gauge at 00g, which is 10mm or 3/8 inch.
However, while there are no more standard gauges, some continue stretching past this point to reach sizes of up to 50mm; that’s a whopping 2 inches!
But you should know that not all gauges can shrink back to their original state. Experts recommend staying at a 2g or under if you think you might ever want to reverse it, with many saying that a 0g or 00g is not likely ever to shrink back.
Of course, everyone heals differently, and as such, not all holes will close at the same rate or at all. So, while these guidelines may apply to many, there are no gauge holes that are guaranteed to close, even at the smallest sizes.
How to Get Started
If your ears aren’t pierced already, now is the time. First, find a reputable licensed piercing shop. This is critical because you want to be sure that whoever is piercing your ears is following sanitation and safety guidelines to the T, or else you risk infection or diseases, such as Hepatitis or HIV.
Then, you must allow your piercing to heal completely before attempting any stretching. Most of the time, this takes about six months. Once healed, you’ll need tapers, plugs, and lubricant to start.
Tapers are sized like gauges and look sort of like a miniature tusks but without the curve. They are a tapered, conical shape with the size referring to the wider end.
Before you start, ensure all your instruments are sterilized and your hands and piercing have been thoroughly washed (two minutes of soapy scrubbing in water as hot as you can stand it.) Some say the best time to do this is right after a shower since the heat softens your earlobes, making them easier to stretch.
The lubricant is used to make it easier to slide the taper in, and then the plug is inserted towards the end of the taper as you slide it through. You should always choose a size that is the next up from your current one and wait about 6-8 weeks between increases to allow healing. But, once you reach the higher end of the scale, you must wait longer, up to 14 weeks for 20mm.
In the meantime, you can buy earrings like the ones for sale at bodypiercejewelry.com.
Should Earlobe Stretching Hurt?
You’ll likely feel something more akin to tingling or stinging. Anything more than mild, tolerable pain is a sign that something is wrong. In most cases, this means you are using a size too big for you and causing tears. If this happens, you should immediately downsize.
With pain, it is also possible that you have an infection. Here are the signs to look for;
• swelling
• blood or pus
• fever
• swollen lymph nodes
If you have any of these symptoms, you should see a healthcare professional right away.
Ear Care After the Stretch
Here are some things you can do that will promote healing and help you avoid infection:
• Only touch piercings with clean hands
• Massage earlobes daily with nontoxic oils, like coconut
• Soak earlobes morning and night in a saline solution
Also, you may notice a slight odor from your piercing. This can be due to dead skin cells accumulating around the plug, with some types of jewelry, like silicone, more prone to being stinky. Some recommend a wood tunnel or plug to use in this case.
However, you should visit a doctor if you notice a nasty odor and pain (or any other signs of infection above).
What Are the Risks of Sizing Up Too Fast?
If you were to ignore the pain, hoping to ride it to get to your goal gauge faster without repercussions, you were mistaken.
One possible consequence is suffering what’s known as a blowout, where you make too many microtears with a too-large gauge, forcing the scar tissue to emerge from your piercing. A blowout needs prompt attention, or its effects are permanent and can prevent you from sizing up further or reversing the stretch.
Another risk is to tear your earlobe or have it detach from your head. This is no joke, folks! So, take it seriously, and go slow.
Ready to Start Your Ear Stretching Journey?
Now that you know what ear stretching entails, you can decide whether it’s right for you. If you choose to go forward with stretching, remember to have patience and allow your ear to completely heal before moving on to the next size. And if you notice signs of infection, always seek the medical advice of a professional.
Ready to expand your mind with more information? Then keep exploring our Lifestyle section for more articles like this.

